


3D UPLOAD
RPG Stories World-Builder now allows you to upload, use, and share your own 3D models via Steam Workshop. This guide will help you understand how easy it is, while also informing you about any limitations and details you should be aware of.
Introduction
This feature allows you to expand the RPGS library with your own custom 3D models. However, because RPG Stories VTT runs on the Unity game engine, external assets require some care.
The application's default assets are lightweight, optimized with low polygon counts, and designed for fast asset streaming. Custom models do not benefit from these built-in optimizations, so keep the following factors in mind before importing large libraries:
-
Loading Times: Custom models increase project load times depending on their complexity and polygon count. Large assets (such as KitBash kits) will take significantly longer to load into memory. Once loaded, runtime performance typically stabilizes.
-
Polygon Count: High-poly models increase GPU overhead. Stick to "game-ready" models that use reduced geometry paired with normal or detailed textures to maintain performance.
-
Collision Accuracy: Default assets feature custom collision meshes to ensure precise snapping and placement (such as resting objects on tables or walls). Imported models may lack this level of collision fidelity.
File Type Support
Here is a list of supported 3d file formats RPG Stories VTT supports:
-
GLTF
-
FBX
-
OBJ
-
STL
-
PLY
-
3MF
-
DAE

How to import a 3d model
We have made sure that importing a 3D Model to RPG Stories VTT will be easy and all it takes is just a few clicks:
-
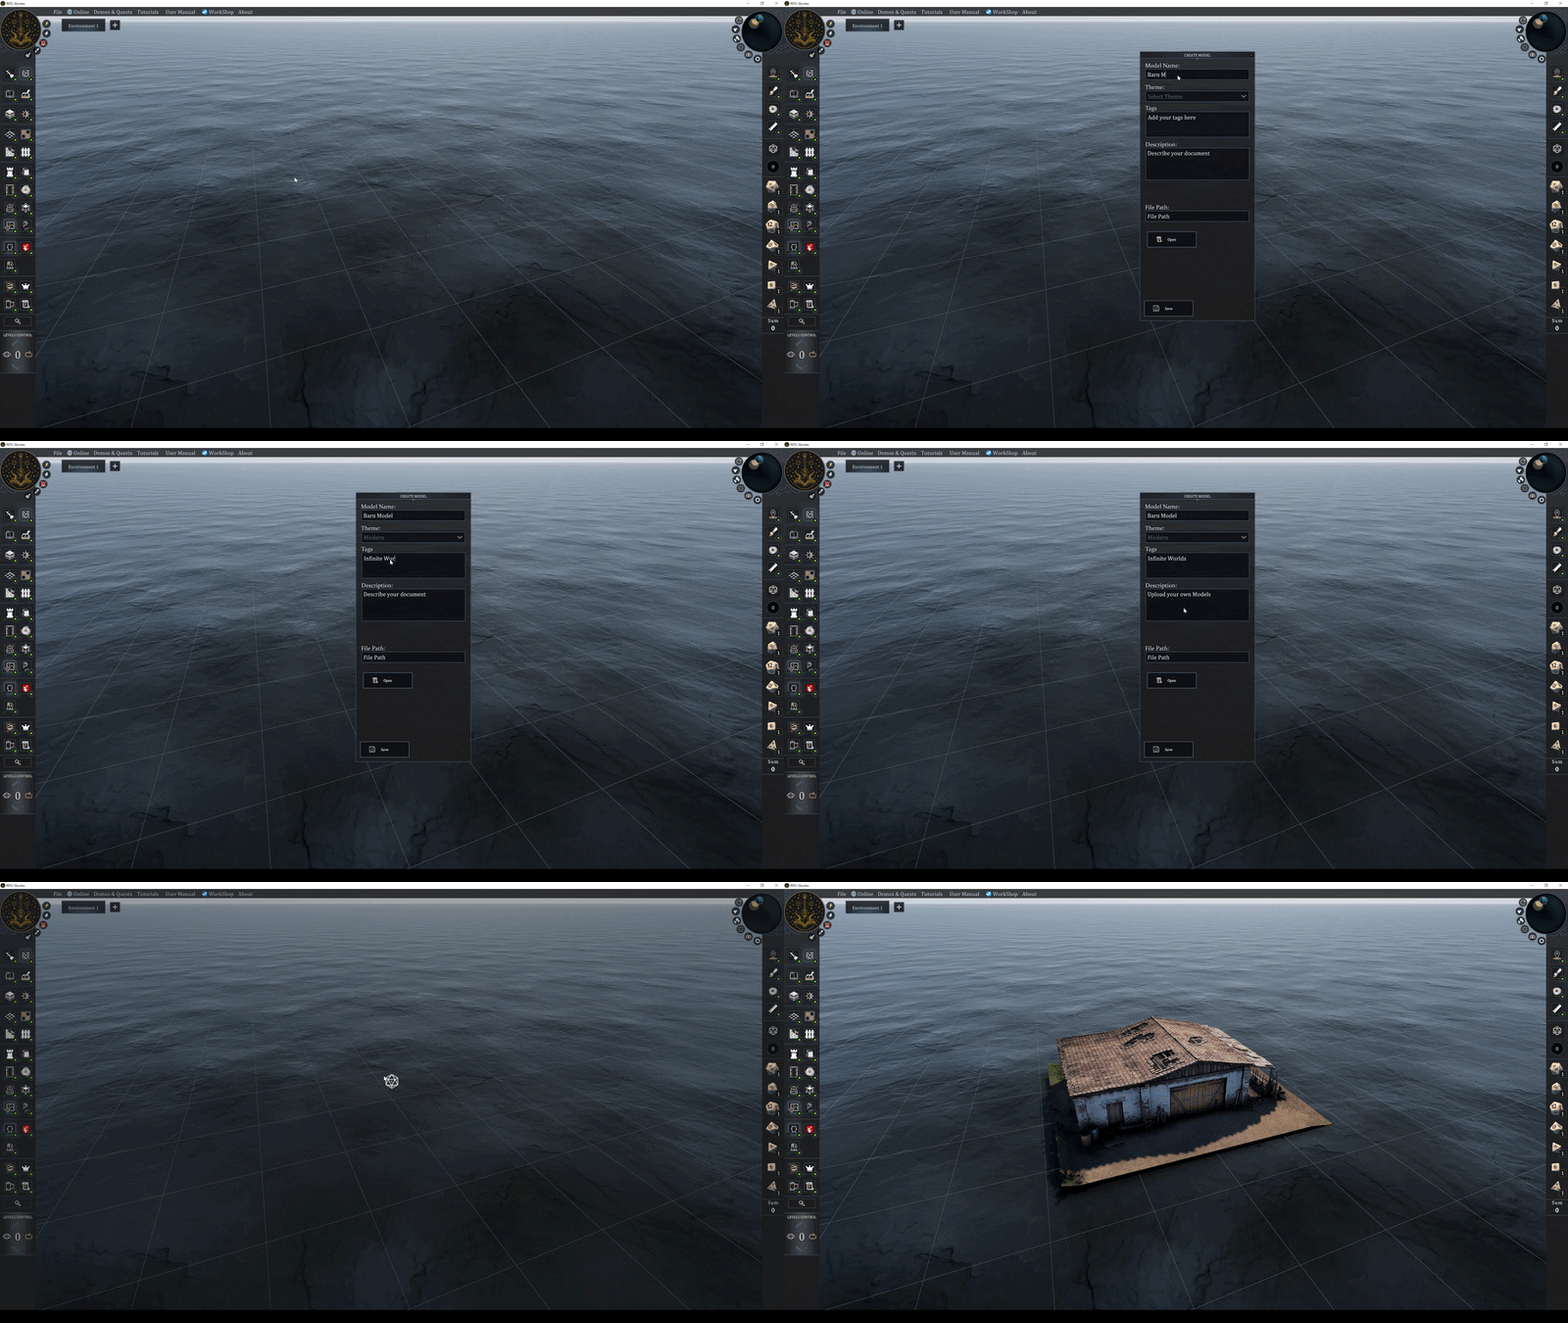
Open the Import Menu: Head over to the User Content Menu and select the option “Import 3D Model”.
-
Fill in the Details: You’ll see the familiar setup fields you're used to:
-
Name: Give your model a clear, recognizable name.
-
Theme: Choose which era your object belongs to so it fits right into your world-building style.
-
Description: Add a few details or notes about your model.
-
Tags: Add any relative tags to make searching for it a breeze later.
-
-
Select Your File: Click the Import 3D Model button. This will pop open your file browser so you can select your file. As soon as you pick it, the model will load right into your environment.
-
Finalize and Save: Take a second to capture a nice thumbnail, adjust your settings just how you like them, and hit save!
-
Use the Steam Workshop button save and share your custom 3D model with the rest of the RPGs community.
You can easily update your model's information anytime by hitting the Edit button in the collection viewer.
If you plan to share your uploads with the community via the Steam Workshop, we advice you to add the appropriate information, descriptions, and tags so that other users can easily find them and use them.


Import Model Settings
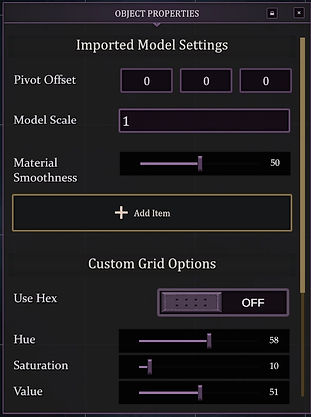
Alongside the 3D Import Model window, the Import Model Settings panel provides options to configure the imported model:
-
Pivot Offset: If a model's center point was not defined correctly by its creator, it may spawn partially underground. While you can adjust its position manually, fine-tuning the center here ensures proper interaction with built-in features like CTRL + Drag placement.
-
Model Scale: Because different 3D software packages handle scaling differently, imported models may occasionally appear extremely small or oversized. You can define the default scale here, which is particularly useful if you plan to share the model on the Steam Workshop.
-
Material Smoothness: Material properties can occasionally be lost during import. Use this option to adjust the surface finish if the imported object appears overly glossy or smooth.
Pivot Showcase

Smoothness Showcase

ADVANCED FEATURES
Separate Textures
Ideally, imported models contain both mesh data and textures within a single file. However, when textures are supplied separately, the application provides a lightweight automated matching system designed to handle common assets (such as KitBash3D models).
Note: While a full manual material correlation editor would be ideal, building one from scratch would significantly delay updates. Instead, this streamlined system bridges the gap. While it won’t catch every single non-standard file structure out there, it successfully automates the process for most popular assets if they follow the required naming convention.
To assign separate textures, select your designated texture folder using the button. The system will scan the folder and map the textures to the 3D model's materials based on the following file naming convention:
[MaterialName]_[TextureType]
-
Material Name: Must match the exact material name defined in your 3D modeling software.
-
Texture Type: Must include one of the recognized system keywords to identify the map type.
Texture Type Associated Keywords
Main Texture, Base map: "basecol", "albedo", "diff" , "base_"
Normal: "normal", "nrm", "bump" , "norm"
Emissive: "emissive", "emit"
Parallax Map: "height", "disp", "parallax"
Batch Import
If you have a large library of assets to bring in, the batch import feature allows you to import all 3D files contained within an entire folder at once.
When running a batch import:
-
The system uses each 3D file's name as its title.
-
The applied Theme, Description, and Tags will be assigned across the imported batch.
By clicking import, the system processes the files sequentially, automatically generates a thumbnail for each, and adds them to your library.
Note: Automated Steamworks upload for batch imports is not currently supported, but this functionality is planned for a future update.
STEAM WORKSHOP
The steam workshop button allows you to upload the 3D models to steam workshop and get to be enjoyed by the rest of the RPG Stories VTT Community.
Sharing Projects with Custom 3D Models
If you use custom models and want to share your projects with other players, such as in multiplayer sessions, the easiest method is to upload your models to the Steam Workshop.
When you save your project, it automatically maintains a reference to all loaded custom models.
When another user opens a project containing Steam Workshop models they don't yet own:
-
The application prompts them to automatically subscribe to the required models.
-
Once the models finish downloading, the environment automatically reloads to integrate the external 3D assets.
If you prefer not to make your custom models publicly available to the entire community, you have a few alternatives:
-
Unlisted Workshop Items: When uploading to the Steam Workshop, you can mark your models as Unlisted so they won't show up in public community browsing while still allowing your players to download them.
-
Manual File Sharing: If you want to avoid using Steam Workshop entirely, you can navigate directly to your local User Content folder, locate the model files, and share them with your users manually.
You can organize your custom items into sub-folders within your content directory; the system will still successfully detect and load them.


KITBASH 3D MODELS
KitBash3D libraries are extremely popular and visually impressive, but they are designed for rendering and cinematic software rather than real-time applications. Consequently, they are exceptionally heavy assets with high polygon counts and complex structures that will significantly increase load times.
While the application features automated texture mapping to help streamline the process, the underlying models remain heavy. If you choose to use KitBash3D assets, configure your download options as follows to get the best possible results:
-
3D Software: Unity
-
Rendering Engine: HDRP
-
Export Settings: 2K (or the lowest resolution available)
-
Download Preferences: All Files
This selection will generate two separate ZIP archives: one containing the 3D assets and another containing the textures.
